


As TypeScript developers, we’re always looking for ways to make our applications smarter and more interactive. While integrating AI into our apps has traditionally meant writing complex Python code or managing large language models, that’s changing. Thanks to frameworks like ADK-TS, we can now build intelligent AI agents right in our TypeScript projects.
In this tutorial, we’ll build a simple multi-agent system that can handle weather queries and tell jokes. You’ll learn how to create AI agents that can:
- Understand and respond to natural language requests
- Use external APIs and tools to fetch real data
- Work together as a coordinated system
- Handle different types of user queries intelligently
By the end of this tutorial, you’ll have a working AI agent system and understand how to extend it for your own projects. Let’s get started.
What are AI Agents?
When we talk about AI agents, we’re talking about making our applications smarter in how they handle user requests. Instead of just responding to specific commands, an AI agent can understand what a user wants and figure out how to help them.
Think about a weather application. A traditional app might require users to click specific buttons or type exact city names. An AI agent, on the other hand, can understand natural questions like “Do I need an umbrella today?” or “What’s the weather like in London?” and know how to get that information.
What makes AI agents different from regular AI integrations? It’s their ability to:
- Understand the context of conversations
- Use different tools and APIs when needed
- Make decisions about how to handle requests
- Work together with other agents to solve problems
These capabilities enable agentic workflow patterns like sequential, parallel, and hierarchical pipelines that power real-world AI applications.
Why Build AI Agents in TypeScript?
As TypeScript developers, we’re used to building well-structured, type-safe applications. While Python has been the go-to language for AI development, TypeScript offers some real advantages:
- We can use our existing TypeScript skills and tools
- We get great IDE support and type checking
- Our agents can easily integrate with our TypeScript/JavaScript backends
- We can seamlessly add AI agents to existing web applications
- We can deploy our agents alongside our existing services
Plus, with frameworks like ADK-TS, we don’t need to learn complex AI concepts or deal with model training. The framework handles the heavy lifting for you—model integrations, built-in session and memory management, tool handling, observability, and more. We can just focus on building useful features using familiar TypeScript patterns.
What Makes ADK-TS Different
ADK-TS is a TypeScript-first framework that simplifies building AI agents and multi-agent systems. It provides type-safe APIs using TypeScript and Zod, supports multiple LLM providers (OpenAI, Anthropic, Gemini, and more), enables streaming responses for real-time interactions, and includes built-in memory management for stateful conversations. The framework is fully open-source, and you can explore the ADK-TS source code on GitHub.
You can also orchestrate multiple agents to work together, create reusable tools for external integrations, and deploy agents as HTTP servers or integrate them into existing applications. The framework uses familiar patterns, such as fluent builders and factory functions, that fit naturally into your TypeScript workflow.
Building Our First AI Agent System
We’ll build a multi-agent system that has one root agent and coordinates two specialized sub-agents:
- Root agent (router): accepts user requests and delegates work to the appropriate sub-agent
- Weather agent: fetches current weather using a
weatherTool - Joke agent: returns random jokes using a
jokeTool
Each sub-agent has its own tools and logic, while the root agent focuses on routing requests. This structure gives us separation of concerns (changes to weather logic won’t affect jokes), easier testing (test tools and agents can run in isolation), and the ability to add new agents without disrupting existing ones.
Let’s set up our project.
Project Folder Structure
Here’s a recommended structure for organizing your project:
my-first-ai-agent/
├── src/
│   ├── agents/
│   │   ├── weather-agent/
│   │   │   ├── tools.ts
│   │   │   └── agent.ts
│   │   ├── joke-agent/
│   │   │   ├── tools.ts
│   │   │   └── agent.ts
│   │   └── agent.ts          # Root agent
│   ├── env.ts
│   └── index.ts
├── .env
├── tsconfig.json
└── package.json
This structure helps keep your code organized by separating each agent into its own folder with its tools. You can adapt this layout to fit your preferences, but this approach makes it easier to maintain and scale as you add more agents. Managing complexity early pays off as your project grows, something you can read more about in understanding technical debt in software development.
Setting Up the Project
Next, open your terminal and run the following commands:
mkdir my-first-ai-agent
cd my-first-ai-agent
pnpm init
Install the necessary dependencies:
pnpm add @iqai/adk dotenv zod
pnpm add -D typescript @types/node tsx
Create a basic TypeScript configuration in tsconfig.json:
// tsconfig.json
{
  "compilerOptions": {
    "target": "ES2020",
    "module": "CommonJS",
    "outDir": "./dist",
    "rootDir": "./src",
    "strict": true,
    "esModuleInterop": true
  }
}
Create a .env file to store your environment variables:
# .env
GOOGLE_API_KEY=your_google_api_key_here
LLM_MODEL=gemini-2.5-flash # Default model
You can get a Google API key from the Google AI Studio.
ADK-TS supports multiple LLM providers, but we will be using Gemini, which is the default provider. To learn more about configuring different LLM providers, check out the ADK-TS documentation.
Lastly, create a .env.ts file to load the environment variables:
// src/env.ts
import { config } from "dotenv";
import { z } from "zod";

config();

export const envSchema = z.object({
 GOOGLE_API_KEY: z.string(),
 LLM_MODEL: z.string().default("gemini-2.5-flash"),
});

export const env = envSchema.parse(process.env);
This sets up our project structure and configuration. Next, we’ll start building our tools and agents.
Agent Interaction Flow
Before we dive into the code, let’s visualize how our multi-agent system works:
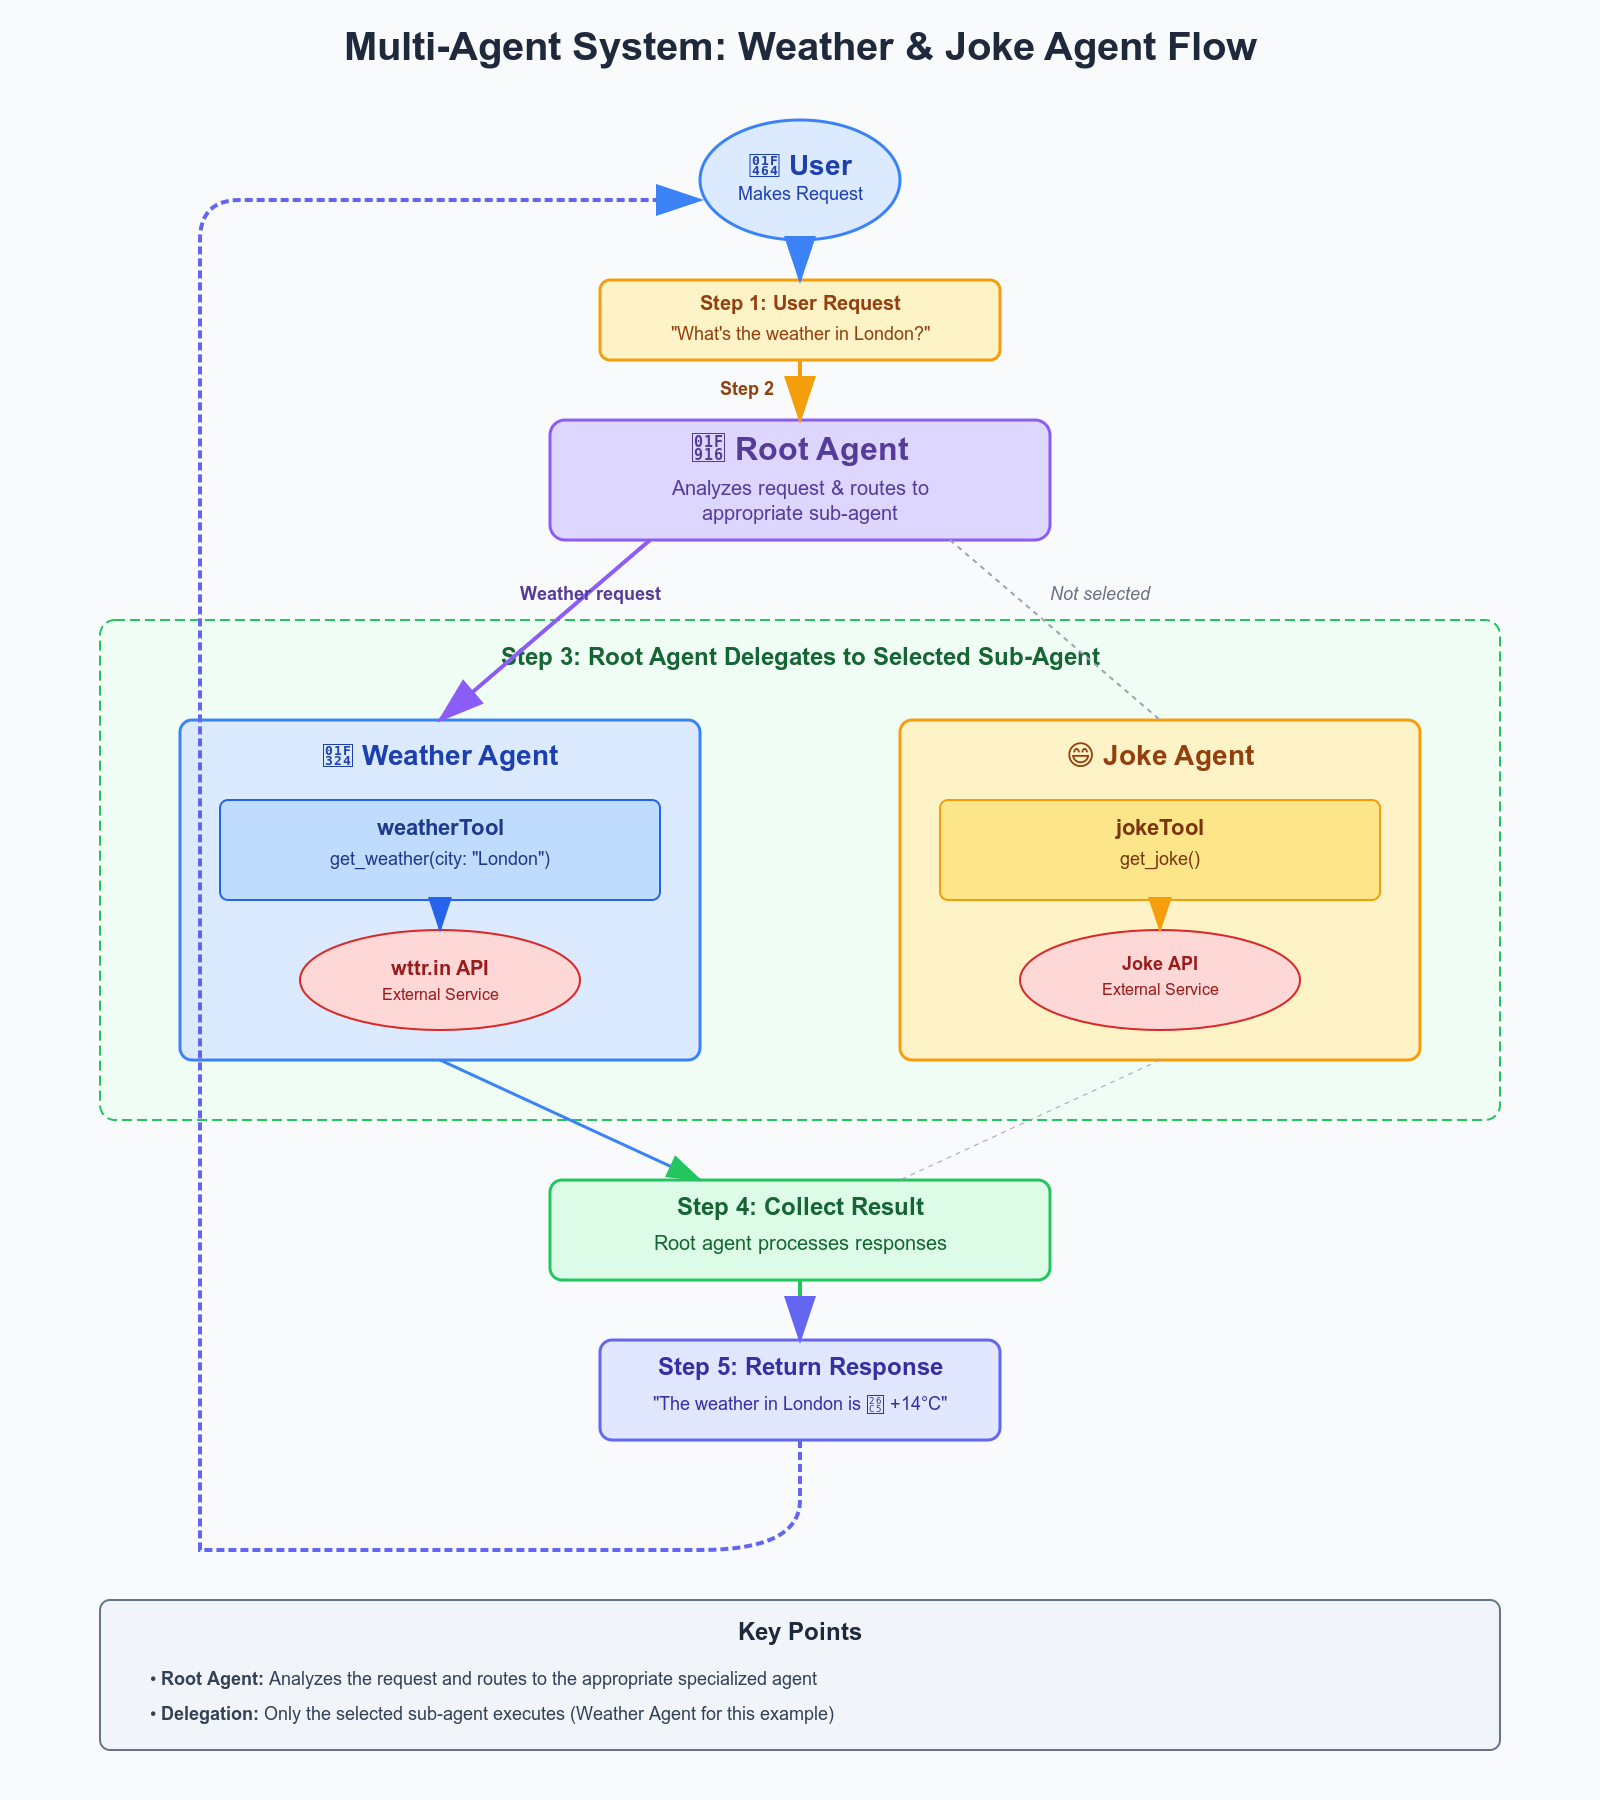
The diagram shows the complete flow of a user request through our system:
- User makes a request - The user asks a natural-language question, such as “What’s the weather in London?”
- Root agent analyzes - The root agent receives the request and determines which specialized agent should handle it
- Root agent delegates - Based on the analysis, the root agent routes the task to the appropriate sub-agent (Weather Agent in this example)
- Selected sub-agent executes - Only the chosen sub-agent activates and uses its tools to fetch data from external APIs
- Response delivered - The sub-agent returns data through the root agent back to the user
If the user had asked for a joke instead, the Joke Agent would be selected, while the Weather Agent would remain inactive. This selective activation ensures efficiency and clarity in handling requests.
Now, let’s start building our tools and agents.
Creating Tools for Our Agents
Before we build the agents, we need to create the tools they will use. Tools are reusable components that encapsulate specific functionality, making it easier for agents to perform tasks. They extend the agent’s capabilities by enabling it to interact with external APIs or services in a structured way.
We will create two tools: one for fetching weather information and another for fetching jokes. These tools will wrap external APIs and provide a clean interface for our agents to use.
Create a new file src/agents/weather-agent/tools.ts:
// src/agents/weather-agent/tools.ts
import { createTool } from "@iqai/adk";
import * as z from "zod";

export const weatherTool = createTool({
  name: "get_weather",
  description: "Get current weather for a city",
  schema: z.object({
    city: z.string().describe("City name"),
  }),
  fn: async ({ city }) => {
    try {
      const response = await fetch(
        `https://wttr.in/${encodeURIComponent(city)}?format=3`
      );
      return await response.text();
    } catch {
      return `Weather unavailable for ${city}`;
    }
  },
});
Next, create src/agents/joke-agent/tools.ts:
// src/agents/joke-agent/tools.ts
import { createTool } from "@iqai/adk";

export const jokeTool = createTool({
 name: "get_joke",
 description: "Fetches a random joke",
 fn: async () => {
  try {
   const response = await fetch(
    "<https://official-joke-api.appspot.com/random_joke>",
   );
   return await response.text();
  } catch {
   return "Joke unavailable right now.";
  }
 },
});
These tools provide the basic capabilities our agents will need. The weather tool can fetch weather information for any city, while the joke tool retrieves random jokes from an API.
Creating Our Specialized Agents
Now that we have our tools ready, let’s create the agents that will use them. Each agent will focus on one specific task - either providing weather information or telling jokes.
In src/agents/weather-agent/agent.ts, create the weather agent:
// src/agents/weather-agent/agent.ts
import { LlmAgent } from "@iqai/adk";
import { env } from "../../env";
import { weatherTool } from "./tools";

export const getWeatherAgent = () => {
  const weatherAgent = new LlmAgent({
    name: "weather_agent",
    description: "provides weather for a given city",
    model: env.LLM_MODEL,
    tools: [weatherTool],
  });

  return weatherAgent;
};
Similarly, in src/agents/joke-agent/agent.ts, create the joke agent:
// src/agents/joke-agent/agent.ts
import { LlmAgent } from "@iqai/adk";
import { env } from "../../env";
import { jokeTool } from "./tools";

export const getJokeAgent = () => {
  const jokeAgent = new LlmAgent({
    name: "joke_agent",
    description: "provides a random joke",
    model: env.LLM_MODEL,
    tools: [jokeTool],
  });

  return jokeAgent;
};
Each agent is configured with a specific purpose and the tools it needs to do its job. The weather agent knows about weather-related queries, while the joke agent handles requests for humor.
Creating the Root Agent
The root agent acts as a coordinator, directing user requests to the appropriate specialized agent. When a user asks a question like “What’s the weather in Paris?” or “Tell me a joke,” the root agent determines which sub-agent should handle the request. If the user asks a question that doesn’t fit either category, the root agent can respond with a default message or handle it gracefully.
Here’s how we set it up in src/agents/agent.ts:
// src/agents/agent.ts
import { AgentBuilder } from "@iqai/adk";
import { env } from "../env";
import { getJokeAgent } from "./joke-agent/agent";
import { getWeatherAgent } from "./weather-agent/agent";

export const getRootAgent = () => {
  const jokeAgent = getJokeAgent();
  const weatherAgent = getWeatherAgent();

  return AgentBuilder.create("root_agent")
    .withDescription(
      "Root agent that delegates tasks to sub-agents for telling jokes and providing weather information."
    )
    .withInstruction(
      `
     You are a routing agent. Analyze the user's request and delegate to the appropriate sub-agent:

    - For ANY request about weather, weather conditions, temperature, or location-based weather queries: delegate to weather_agent
    - For ANY request about jokes, humor, comedy, or asking to tell a joke: delegate to joke_agent

    Do not answer questions yourself. Always delegate to the appropriate sub-agent based on the request type.`
    )
    .withModel(env.LLM_MODEL)
    .withSubAgents([jokeAgent, weatherAgent])
    .build();
};
Putting It All Together
Finally, let’s create our main application file that uses our agent system. In src/index.ts:
// src/index.ts
import * as dotenv from "dotenv";
import { getRootAgent } from "./agents/agent";

dotenv.config();

async function main() {
	const questions = ["how is weather in london?", "tell me a random joke"];

	const { runner } = await getRootAgent();

	for (const question of questions) {
		console.log(`📝 Question: ${question}`);
		const response = await runner.ask(question);
		console.log(`🤖 Response: ${response}`);
	}
}

main().catch(console.error);
This code creates our agent system and tests it with a couple of simple questions. The root agent automatically figures out which specialized agent should handle each request.
Running Your Agent
To run your agent system, add these scripts to your package.json:
{
  "scripts": {
    "dev": "tsx watch src/index.ts",
    "build": "tsc",
    "start": "node dist/index.js"
  }
}
And run your agent using:
pnpm dev
You should see output like:
📝 Question: how is weather in london?
🤖 Response: The weather in London is ⛅️ +14°C.
📝 Question: tell me a random joke
🤖 Response: Why do programmers prefer dark mode? Because light attracts bugs!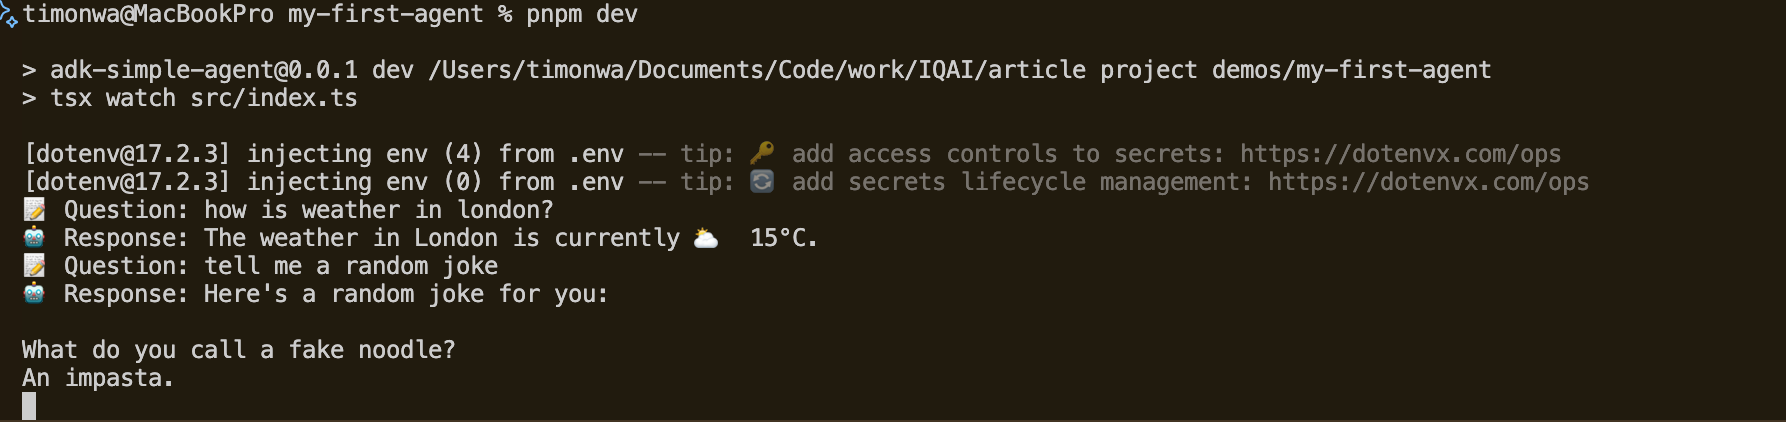
Using the CLI for Interactive Testing
Instead of writing test scripts, you can interact with your agent directly using the ADK-TS CLI. First, install the CLI:
# Install globally
pnpm add -g @iqai/adk-cli

# Or use npx without global installation
npx @iqai/adk-cli
The CLI provides two ways to test your agents:
Terminal-Based Chat (adk run): Start an interactive chat session in your terminal for quick testing and experimentation.
Web-Based Interface (adk web): Launch a local web server with a visual chat interface for a more user-friendly experience.
Both methods auto-discover your agents from the src/agents directory and let you test without writing any scripts. For detailed installation and usage instructions, check out the CLI documentation.
Using ADK-TS Built-in Tools
ADK-TS also includes several built-in tools you can use right away without creating custom implementations. For example, if you want to add web search capabilities to your agent, you can use the built-in GoogleSearch tool:
import { GoogleSearch, LlmAgent } from "@iqai/adk";
import { env } from "../env";

export const getSearchAgent = () => {
  return new LlmAgent({
    name: "search_agent",
    description: "searches the web for information",
    model: env.LLM_MODEL,
    tools: [new GoogleSearch()], // Use the built-in tool
  });
};
Check out the tools documentation to see what’s available and how to use them.
Taking Your Agent Further
While our weather and joke example is straightforward, you can apply these same patterns to build more sophisticated agents. Here are some real-world applications:
Customer Service Agent
You could extend this pattern to create a customer service agent that answers product questions using a product database, handles order status inquiries by connecting to your order system, escalates complex issues to human support when needed, and maintains conversation context across multiple questions.
Development Assistant
Create an agent that helps with coding tasks by analyzing pull requests and suggesting improvements, helping debug code by running tests and analyzing logs, generating documentation from code comments, and reviewing code for security issues.
Blockchain Portfolio Agent
Build an agent that helps users manage their cryptocurrency investments by tracking portfolio performance across multiple exchanges, analyzing market trends using price data APIs, sending alerts for significant price changes, and providing insights on potential investment opportunities based on historical data and current market conditions. For inspiration, check out the autonomous blockchain agent template using ADK-TS and NEAR.
Conclusion
In this tutorial, we’ve built a multi-agent system using TypeScript and ADK-TS. We’ve seen how to create specialized agents that handle specific tasks, equip our agents with tools to give them real capabilities, coordinate multiple agents through a root agent, and structure our code in a maintainable way.
This is just the beginning of what you can do with AI agents in TypeScript. Whether you’re building a customer service system, a blockchain portfolio manager, or something entirely new, the patterns we’ve covered here will help you create organized and effective agent-based applications.
Next Steps
To view the complete code used in this tutorial, you can:
- Run
npx @iqai/adk-cli new --template simple-agent my-first-agentto scaffold a new project - Visit the GitHub repository to explore the source code
Ready to build your own AI agent? Check out the ADK-TS documentation for more examples and advanced features.
Frequently Asked Questions
What is an AI agent, and how is it different from a chatbot?
A chatbot follows predefined scripts or responds based on pattern matching. An AI agent goes further by reasoning about what the user needs, choosing which tools to call, and taking actions on its own. For example, a chatbot might recognize "weather" as a keyword and return a canned response, while an AI agent understands "Do I need an umbrella in London?" and calls a weather API to give a real answer.
Agents can also delegate work to other agents, maintain context across turns, and decide between multiple tools based on the situation.
Can you build AI agents in TypeScript instead of Python?
Yes. TypeScript frameworks like ADK-TS, Vercel AI SDK, and LangChain.js all support building AI agents. You get the same core capabilities (tool calling, multi-agent orchestration, memory) with the added benefits of type safety, IDE autocompletion, and seamless integration with existing Node.js backends.
If your stack is already TypeScript, there's no need to introduce Python just for AI features.
What is a multi-agent system and when should you use one?
A multi-agent system uses multiple specialized agents that each handle a specific task, coordinated by a root agent that routes requests. You'd use one when a single agent would need too many tools or instructions to handle everything well.
For example, instead of one agent that handles weather, jokes, and search all at once, you split it into a weather agent, a joke agent, and a search agent. Each stays focused, is easier to test, and can be updated independently. A root agent like AgentBuilder.create("root_agent").withSubAgents([...]) handles the routing.
How do AI agent tools work?
Tools are functions that enable an agent to interact with the outside world. When an agent receives a request it can't answer from its training data alone, it decides which tool to call, passes the right arguments, and uses the result to form its response.
Each tool has a name, description, input schema, and an execution function. The description helps the LLM understand when to use it. For instance, a tool described as "Get current weather for a city" with a city string parameter lets the agent call a weather API whenever a user asks about the weather.
What LLM providers can you use with TypeScript AI agent frameworks?
Most TypeScript agent frameworks support multiple providers out of the box. Common options include OpenAI (GPT-4.1, GPT-5.4), Anthropic (Claude), Google (Gemini), and open-source models through Ollama or Together AI.
You typically configure the provider and model name when creating an agent, like model: "gemini-2.5-flash" or model: "gpt-4.1". Switching providers usually means changing one config value, not rewriting your agent logic.


