


This is Part 2 of a 2-part series. If you haven’t built the core pipeline yet, start with Part 1. It covers the Sequential Agent pattern, shared state, and the 4-agent research pipeline we’re building on here. You can find the full source code for this project on GitHub.
In Part 1, we built a research assistant using ADK-TS’s Sequential Agent pattern: four agents running in a strict pipeline, communicating through shared state. The result was a working system that takes any topic and produces a comprehensive research report.
But “working” and “production-ready” are two different things.
Right now, our pipeline runs silently. It kicks off while we wait around 30-60 seconds, with no idea what’s happening. There’s no way to configure the behavior without editing the code. And every research session vanishes the moment it completes. Shipping it like this might feel faster, but it’s the kind of shortcut that quickly becomes technical debt.
In this guide, we’ll add four features from ADK-TS, a TypeScript AI agent framework, that close those gaps:
- Before/after agent callbacks - so you can see which step is running and how long each takes
- Before tool callback - so the researcher can’t exceed the search limit, enforced at the framework level
- Session state initialization - so app-level config lives in state, not hardcoded in instructions
- Memory service - so completed research sessions persist and can be searched across sessions
Each feature is independent. You can adopt any one without the others. Together, they make your multi-agent system observable, configurable, and stateful.
TL;DR
- Agent callbacks let you log progress, measure timing, and conditionally skip agents without modifying agent code
- Tool callbacks enforce hard search limits and prevent LLMs from batching multiple tool calls in a single turn
- Session state prefixes scope your data:
app:for global config,user:for per-user preferences,temp:for ephemeral data, and unprefixed for pipeline outputs .withQuickSession()pre-loads state so agents can read config values at runtime via template syntax- MemoryService persists completed sessions and makes them searchable across future runs (use
InMemoryStorageProviderfor dev and a persistent backend for production)
Prerequisites
This guide picks up where Part 1 left off. You should have:
- The research assistant project from Part 1, with the 4-agent pipeline working
- Everything from Part 1’s prerequisites (Node.js 18+, API keys, TypeScript familiarity). If you’re completely new to AI agents, this beginner’s guide to building AI agents with ADK-TS is a good starting point
- A basic understanding of how
outputKeyand{state_key}templates work (covered in Part 1)
Understanding AI Agent Callbacks, State, and Memory
Before we dive into the code, let’s understand what each feature does and why you’d use it.
AI Agent Callbacks: Lifecycle Hooks for Logging and Monitoring
Right now, our pipeline runs silently. You start it, wait 30-60 seconds, and eventually get a report with no indication of what happened in between. Agent callbacks fix this by letting you hook into each agent’s lifecycle.
Every LlmAgent supports two optional callbacks:
beforeAgentCallbackruns before the agent processes its turn. Use it for logging, validation, or conditionally skipping the agent.afterAgentCallbackruns after the agent finishes. Use it for logging, cleanup, or metrics.
Both receive a CallbackContext with agentName, state (read/write), and invocationId. The return value controls what happens next:
- Return
undefinedto let the callback’s agent (the one it’s attached to) proceed with its normal execution. For example, ifbeforeAgentCallbackis attached to the analyst agent and returnsundefined, the analyst runs its LLM call as usual. - Return a
Contentobject to skip the agent entirely. The returned content is used as the agent’s output instead, and the pipeline proceeds to the next step. This is useful for caching or skipping agents when their output already exists in state.
Because callbacks are separate from agent definitions, you can add logging and monitoring across all four agents without touching their instructions or logic.
Tool Callbacks: How to Rate Limit AI Agent Tool Calls
In Part 1, the researcher agent’s instructions say “make only ONE web_search call per turn.” But instructions are suggestions, not rules. Many LLMs ignore this and batch all their searches into a single response, which can blow through rate limits or return lower-quality results.
Tool callbacks solve this at the framework level. While agent callbacks hook into the agent’s lifecycle, tool callbacks hook into individual tool calls:
beforeToolCallbackfires before each tool call.afterToolCallbackfires after each tool call completes.
The beforeToolCallback receives tool, args, and toolContext. The return value works similarly to agent callbacks:
- Return
undefinedto let the tool execute normally. - Return a
Record<string, any>to skip the tool entirely. The returned object gets sent back to the LLM as if it were the tool’s actual response.
This is how you enforce hard limits that can’t be prompt-engineered around. The LLM never knows the tool was blocked; it just sees a response telling it to try again next turn.
AI Agent Session State: Scoped Configuration with Key Prefixes
In Part 1, configurations such as the number of searches were hard-coded in the agent instructions. If you wanted to change it, you’d edit the code. Session state prefixes give you a better option by letting you store config in state and scope it appropriately.
ADK-TS supports four state scopes through key prefixes:
| Prefix | Scope | Example | Persisted? |
|---|---|---|---|
app: |
All users, all sessions (app-wide) | app:pipeline_steps |
Yes |
user: |
All sessions for one user | user:preferred_model |
Yes |
temp: |
Current session only | temp:researcher_agent_start |
No |
| (none) | Current session only | search_results |
Yes |
The prefix is part of the key name, so app:pipeline_steps and pipeline_steps are two different keys. Agents can read these values at runtime using template syntax in their instructions, such as {app:report_format}, which gets replaced with the actual value before the LLM sees it.
AI Agent Memory: How to Persist Data Across Sessions
Without memory, every research session is a one-off. The pipeline runs, produces a report, and all intermediate data (search results, analyses, recommendations) are lost when the session ends. If a user researches “AI in healthcare” today and “AI in drug discovery” next week, the second session has no way to build on the first. This is a common challenge across agent frameworks, not just ADK-TS.
ADK-TS’s MemoryService solves this by storing completed sessions and making them searchable. The flow looks like this:
- Run the pipeline. Session state accumulates outputs from each agent (
search_results,analysis_report, etc.). - Save to memory by calling
memoryService.addSessionToMemory(session)after the pipeline completes. This persists the full session, including all states, to the storage backend. - Search later with
memoryService.search({ query: "...", userId: "..." }). This returns matching sessions based on keyword overlap with the stored content.
The MemoryService requires a storage provider. ADK-TS ships with InMemoryStorageProvider, which keeps everything in process memory. It’s fine for development and testing, but resets when the app restarts. For production, you’d implement the MemoryStorageProvider interface with a persistent backend like PostgreSQL, or use a vector store like Pinecone for semantic search.
How to Add Callbacks, State, and Memory to a TypeScript AI Agent
Now that you understand what each feature does, let’s wire them into the research assistant from Part 1. We’ll work through five steps: creating the callback functions, attaching them to agents, adding tool-level search limits, initializing session state, and connecting the memory service.
Step 1: Create the Callbacks File
First, create a shared callbacks file. Both callbacks use the same STEP_LABELS map to translate agent names into human-readable progress labels, and store timing data in temp: state.
// src/callbacks.ts
import type { CallbackContext } from "@iqai/adk";

const STEP_LABELS: Record<string, string> = {
  researcher_agent: "Step 1/4: Researcher",
  analyst_agent: "Step 2/4: Analyst",
  recommender_agent: "Step 3/4: Recommender",
  writer_agent: "Step 4/4: Writer",
};

// Logs the step name and records start time in temp state
export const beforeAgentCallback = async (ctx: CallbackContext) => {
  const label = STEP_LABELS[ctx.agentName] ?? ctx.agentName;
  ctx.state[`temp:${ctx.agentName}_start`] = Date.now();
  console.log(`\\\\n>>${label} - Starting...`);
  return undefined;
};

// Logs completion with duration
export const afterAgentCallback = async (ctx: CallbackContext) => {
  const label = STEP_LABELS[ctx.agentName] ?? ctx.agentName;
  const startTime = ctx.state[`temp:${ctx.agentName}_start`] as
    | number
    | undefined;
  const duration = startTime
    ? ((Date.now() - startTime) / 1000).toFixed(1)
    : "?";
  console.log(`<<${label} - Complete (${duration}s)`);
  return undefined;
};
Two things to notice:
temp:prefix on the start timestamp means it won’t be persisted to storage. It’s ephemeral data that only matters during this execution.return undefinedtells ADK-TS to let the agent run normally. If you returned aContentobject instead, the agent would be skipped entirely.
Step 2: Attach Callbacks to Each Agent
Now import and attach the callbacks to each sub-agent. Here’s an example of the analyst agent. The pattern is identical for all four agents:
// src/agents/analysis-report-agent/agent.ts
import { LlmAgent } from "@iqai/adk";
import { env } from "../../env";
import { STATE_KEYS } from "../../constants";
// Importing callbacks to log start time and completion for the writer agent
import { beforeAgentCallback, afterAgentCallback } from "../../callbacks";

export const getAnalysisAgent = () => {
  return new LlmAgent({
    name: "analyst_agent",
    description:
      "Analyzes raw research data to extract key insights and patterns",
    model: env.LLM_MODEL,
    outputKey: STATE_KEYS.ANALYSIS_REPORT,
    beforeAgentCallback, // Added beforeAgentCallback
    afterAgentCallback, // Added afterAgentCallback
    disallowTransferToParent: true,
    disallowTransferToPeers: true,
    instruction: `...`, // unchanged from Part 1
  });
};
Do the same for all four agents. It’s three lines added to each, and nothing else changes.
Step 3: Add Tool Callbacks to Enforce Search Limits
This is where tool callbacks earn their keep. The researcher agent from Part 1 is instructed to “make only ONE web_search call per turn,” but LLMs don’t reliably follow this. Many models batch all 3 searches into one response.
The fix uses two tool callbacks working together:
beforeToolCallbackenforces the total search limit and prevents parallel batchingafterToolCallbackresets the per-turn flag after each search completes
// src/agents/researcher-agent/agent.ts
import { LlmAgent, WebSearchTool } from "@iqai/adk";
import type { BaseTool, ToolContext } from "@iqai/adk";
import { env } from "../../env";
import { STATE_KEYS, MAX_SEARCHES } from "../../constants";
import { beforeAgentCallback, afterAgentCallback } from "../../callbacks";

// Enforces search limit AND prevents parallel tool calls
const enforceSearchLimit = async (
  _tool: BaseTool,
  _args: Record<string, any>,
  toolContext: ToolContext
) => {
  const count = (toolContext.state["temp:search_count"] as number) || 0;

  if (count >= MAX_SEARCHES) {
    return {
      result: `Search limit reached (${MAX_SEARCHES}/${MAX_SEARCHES}). Compile your research data now.`,
    };
  }

  // Block parallel tool calls — one search per LLM response
  if (toolContext.state["temp:search_in_progress"]) {
    return {
      result: `Only ONE search per turn.${count}/${MAX_SEARCHES} done. Search again in your NEXT response.`,
    };
  }

  toolContext.state["temp:search_count"] = count + 1;
  toolContext.state["temp:search_in_progress"] = true;
  return undefined;
};

// Clears the in-progress flag so the next turn can search
const clearSearchFlag = async (
  _tool: BaseTool,
  _args: Record<string, any>,
  toolContext: ToolContext,
  _toolResponse: Record<string, any>
) => {
  toolContext.state["temp:search_in_progress"] = false;
  return undefined;
};

export const getResearcherAgent = () => {
  return new LlmAgent({
    name: "researcher_agent",
    // ...same config as Part 1...
    tools: [new WebSearchTool()],
    beforeAgentCallback,
    afterAgentCallback,
    beforeToolCallback: enforceSearchLimit, // Added beforeToolCallback
    afterToolCallback: clearSearchFlag, // Added afterToolCallback
    // ...instruction unchanged from Part 1...
  });
};
Here’s what happens when the model tries to batch 3 searches in one response:
- Search 1: count is 0,
search_in_progressis false → allows the search, sets flag - Search 2 (parallel): sees
search_in_progress = true→ blocked - Search 3 (parallel): same → blocked
- Search 1 completes →
clearSearchFlagresets the flag - Next LLM turn: model makes Search 2 (allowed)
- Repeat for Search 3
The temp: prefix ensures these counters aren’t persisted across sessions. This same pattern works for any tool limit you need: API rate controls, cost budgets, or runaway loop prevention.
Step 4: Initialize Session State with App-Level Config
So far, all our configuration lives in code. The search limit is a constant, the pipeline steps are defined in the agent setup, and there’s nothing a user or environment can change at runtime. We can improve this by pre-loading session state with app-level config when the root agent is created. This also connects to the memory service we covered earlier:
// src/agents/agent.ts

import {
  AgentBuilder,
  MemoryService, // Import MemoryService to connect it to the builder
  InMemoryStorageProvider, // Import InMemoryStorageProvider for development memory storage
} from "@iqai/adk";
import { getResearcherAgent } from "./researcher-agent/agent";
import { getAnalysisAgent } from "./analysis-report-agent/agent";
import { getRecommenderAgent } from "./recommender-agent/agent";
import { getWriterAgent } from "./writer-agent/agent";

export const getRootAgent = async () => {
  const researcherAgent = getResearcherAgent();
  const analysisAgent = getAnalysisAgent();
  const recommenderAgent = getRecommenderAgent();
  const writerAgent = getWriterAgent();

  // Initialize the memory service with an in-memory storage provider for development
  const memoryService = new MemoryService({
    storage: new InMemoryStorageProvider(),
  });

  return (
    AgentBuilder.create("research_assistant")
      .withDescription(
        "Sequential research pipeline: research → analyze → recommend → write"
      )
      .asSequential([
        researcherAgent,
        analysisAgent,
        recommenderAgent,
        writerAgent,
      ])
      // Pre-load session state with app-level config and user ID for memory scoping
      .withQuickSession({
        appName: "research_assistant",
        userId: process.env.USER_ID ?? "user",
        state: {
          "app:pipeline_steps": [
            "researcher",
            "analyst",
            "recommender",
            "writer",
          ],
        },
      })
      // Connect the memory service to enable state persistence across agents
      .withMemory(memoryService)
      .build()
  );
};
.withQuickSession() creates a session pre-loaded with state. The app: prefix means these values are app-wide, shared across all users and sessions.
The userId scopes user:-prefixed state and memory searches to a specific user, so one user’s preferences and past research don’t leak into another’s. In production, you’d retrieve this from your auth system rather than hard-code it.
.withMemory(memoryService) connects the memory service to the builder so completed sessions can be stored and searched.
Step 5: Add the Memory Service for Cross-Session Persistence
Finally, update src/index.ts to tie everything together. This demonstrates reading session state, running the pipeline (with callbacks logging progress), saving the completed session to memory, and searching it:
// src/index.ts
import * as dotenv from "dotenv";
import { MemoryService, InMemoryStorageProvider } from "@iqai/adk";
import { getRootAgent } from "./agents/agent";

dotenv.config();

async function main() {
  const { runner, session } = await getRootAgent();

  const memoryService = new MemoryService({
    storage: new InMemoryStorageProvider(),
  });

  console.log("==============================");
  console.log("  Research Assistant Pipeline");
  console.log("==============================\\\\n");

  console.log("Session state (app-level config):");
  console.log(
    `  app:pipeline_steps =${JSON.stringify(session.state["app:pipeline_steps"])}`
  );
  console.log();

  const topic = "Impact of artificial intelligence on healthcare in 2025";

  console.log(`Research topic: "${topic}"\\\\n`);
  console.log("Starting sequential pipeline...\\\\n");

  try {
    const result = await runner.ask(topic);

    console.log("\\\\n" + "=".repeat(50));
    console.log("  Final Report");
    console.log("=".repeat(50) + "\\\\n");
    console.log(result);

    // Save session to memory for future recall
    await memoryService.addSessionToMemory(session);
    console.log("\\\\nResearch session saved to memory.");

    // Search past research
    const memories = await memoryService.search({
      appName: "research_assistant",
      userId: process.env.USER_ID ?? "user",
      query: topic,
    });
    console.log(`Found${memories.length} stored session(s).`);
  } catch (error) {
    console.error("Error running research pipeline:", error);
  }
}

main().catch(console.error);
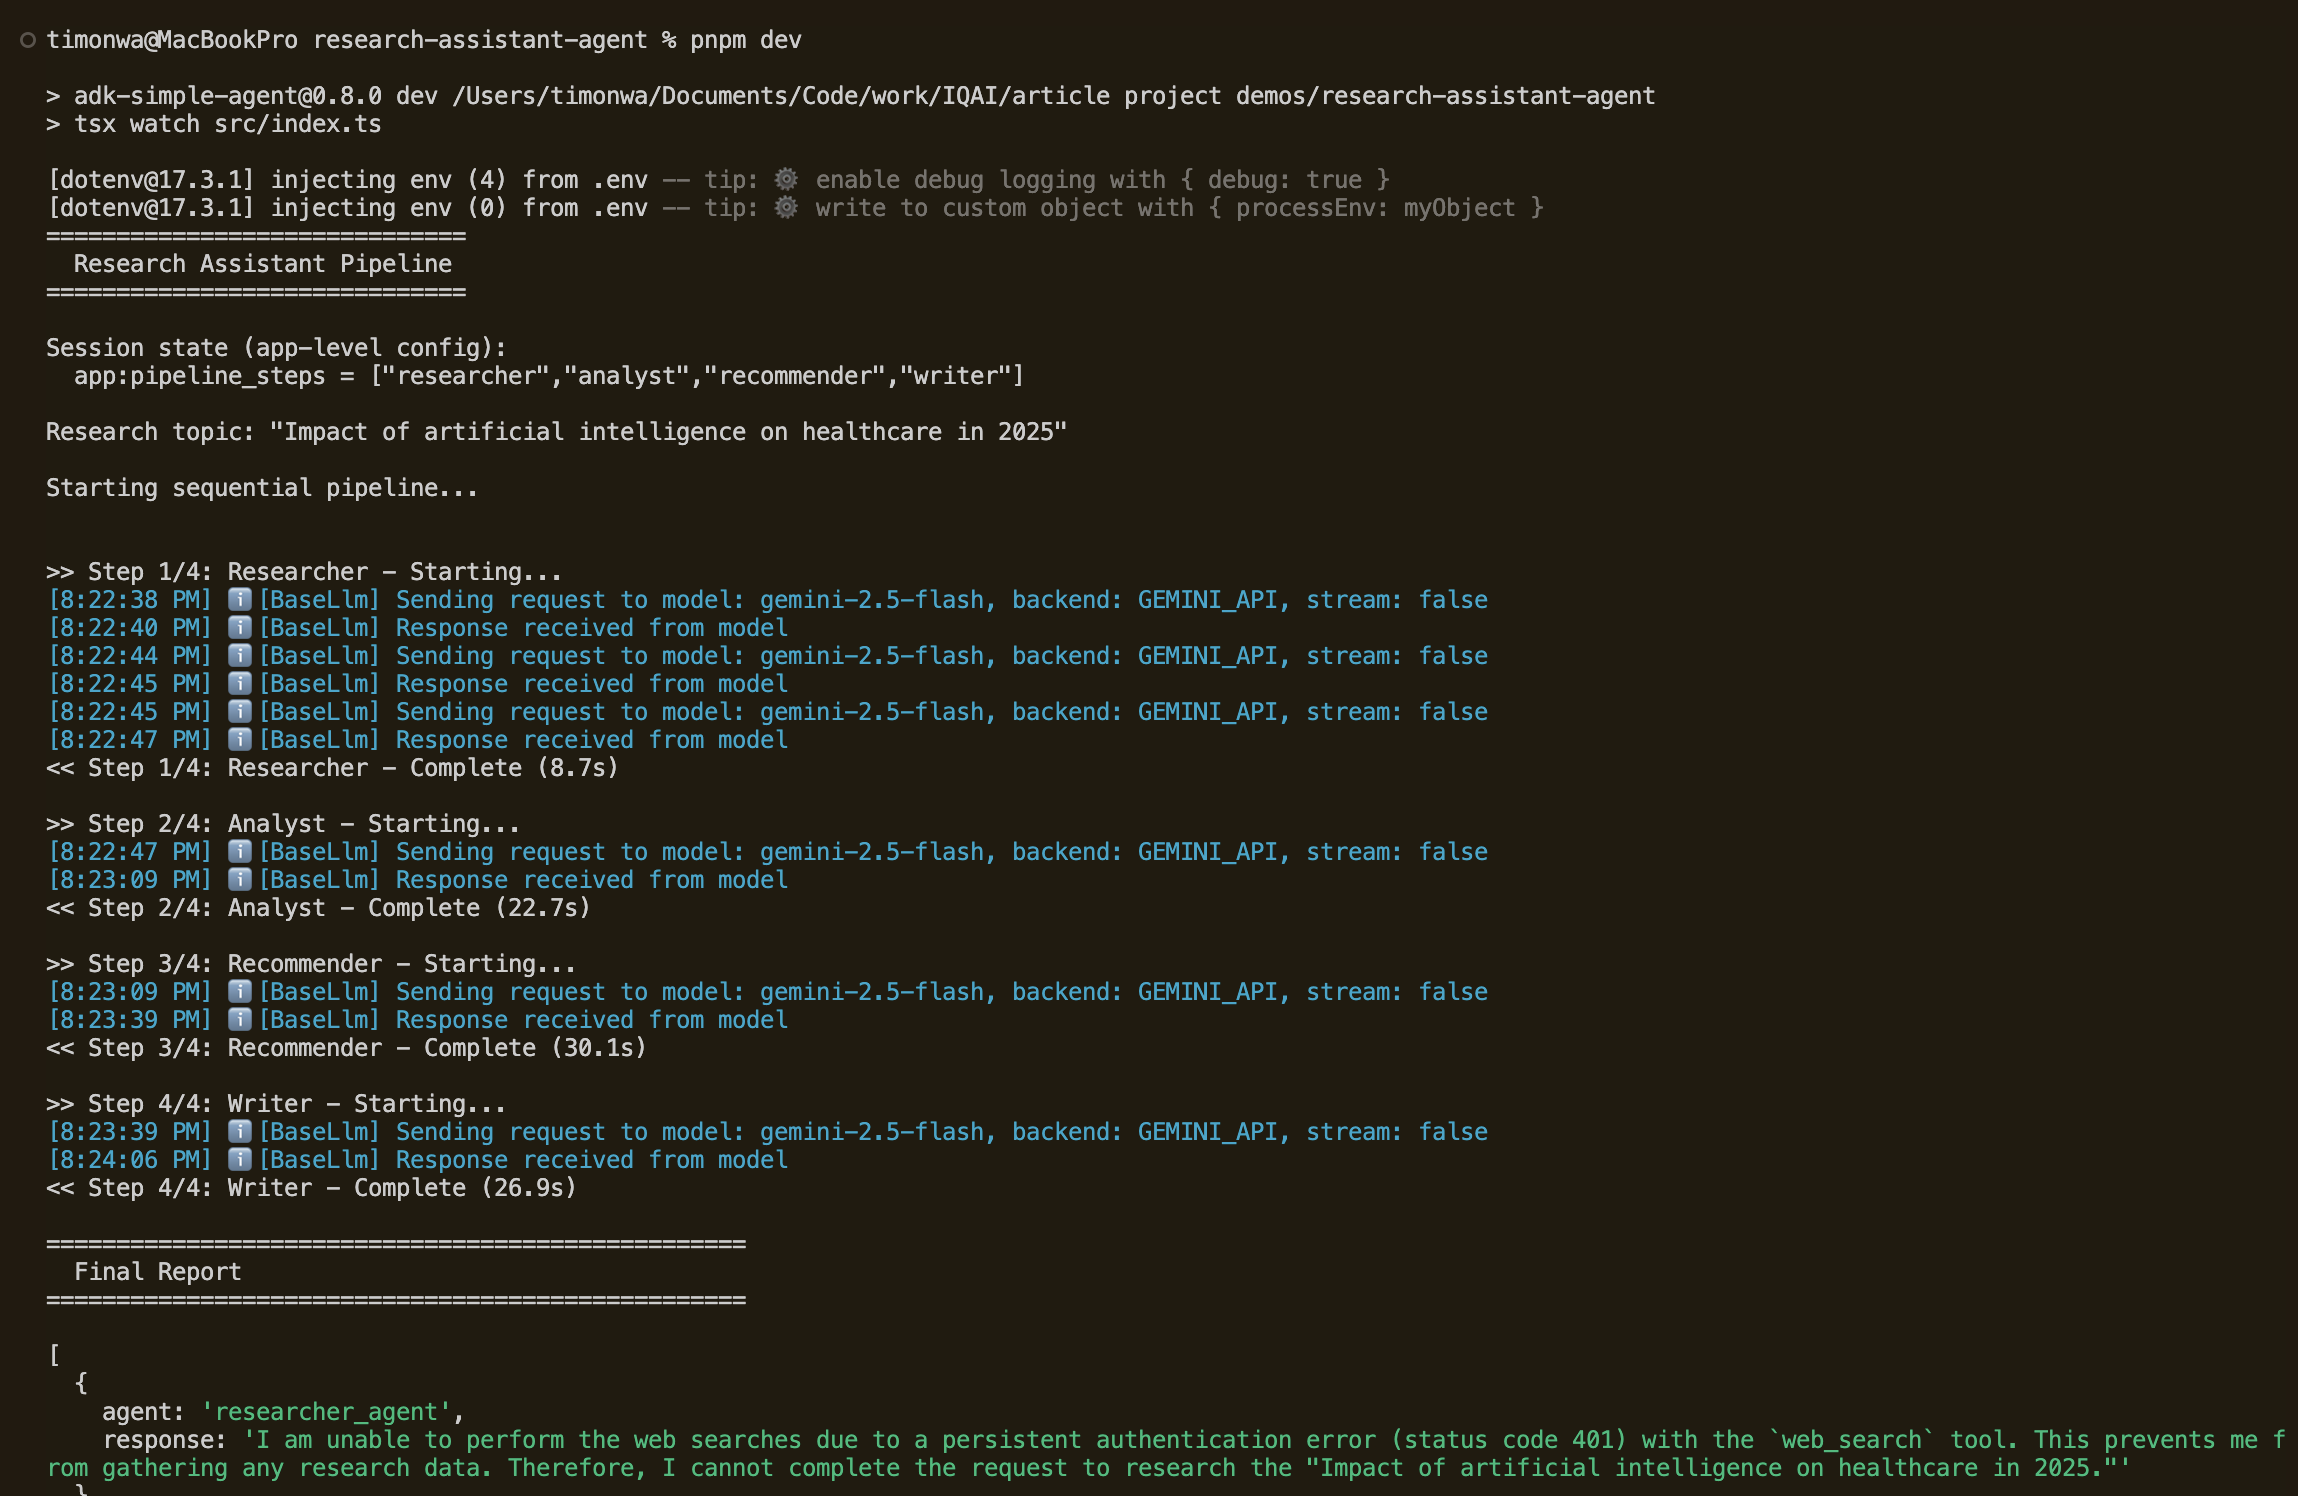
Run pnpm dev to execute the pipeline. You’ll see the agent callbacks log each step’s start and completion with timing as the pipeline progresses. At the end, the memory service confirms the session was saved and is searchable.

Advanced Patterns: Extending AI Agent Callbacks, State, and Memory
There’s a lot more you can do with callbacks, state, and memory beyond what we’ve covered. The patterns we built (logging, search limits, app-wide config, in-memory storage) are starting points. Here are a few ways to push them further.
Conditionally Skip Steps in a Multi-Agent Pipeline
You can use beforeAgentCallback to check if a valid output already exists in state and skip the agent entirely. This is essentially agent-level caching. If a previous session already analyzed this topic, why run the analyst again?
// src/callbacks.ts
export const skipIfDataExists = async (ctx: CallbackContext) => {
  const existingReport = ctx.state["analysis_report"];
  if (existingReport) {
    console.log(`Skipping${ctx.agentName}, data already exists`);
    return { parts: [{ text: existingReport }] };
  }
  return undefined;
};
Layer State Prefixes for Multi-Tenant Apps
You can use all four prefix levels to separate concerns: app: for global config, user: for per-user preferences, and session-scoped keys for pipeline data. An agent instruction like Write in {user:report_format} format adapts automatically based on who’s running it, with no code changes needed.
Persist AI Agent Memory in Production
InMemoryStorageProvider is fine for development, but at some point, you’ll want research to survive a restart. Implement MemoryStorageProvider with PostgreSQL or MongoDB, or use a vector store like Pinecone or pgvector for semantic search. That way, users can find past research even when their query doesn’t exactly match the stored content. For inspiration, see the ADK-TS Agent Arena Hackathon Winners, where projects like ResearchOS combine ADK-TS agents with Weaviate for vector-based paper discovery and retrieval.
Integrate AI Agent Callbacks with OpenTelemetry
Our callbacks use console.log, which is fine for development but doesn’t scale. ADK-TS provides built-in observability through OpenTelemetry integration, including distributed tracing, metric collection, and auto-instrumentation out of the box.
It works with platforms like Jaeger, Grafana, Datadog, and any OTLP-compatible backend. Replace console.log calls in your callbacks with telemetry spans and metrics to build per-agent latency dashboards, enable error tracking, and capture execution traces. OpenTelemetry is also defining semantic conventions for generative AI systems, which standardize how agent frameworks report traces, metrics, and logs.
Conclusion
With these additions, your research assistant has gone from a working demo to something closer to production-ready:
- Callbacks give you visibility into what’s happening while the pipeline runs: which step is active, how long each takes, and the ability to conditionally skip steps.
- Session state prefixes separate configuration from data. App-wide settings use
app:, temporary data usestemp:, and pipeline outputs use session-scoped keys. - Memory service makes research persistent and searchable, turning your assistant from a stateless tool into a growing knowledge base.
Each feature is modular, so you can adopt them incrementally based on what your application needs. The sequential pipeline from Part 1, combined with these framework features, gives you a solid foundation for building production-ready multi-agent systems in TypeScript.
The full source code is available on GitHub and matches the tutorial exactly, so you can follow along step by step. You’ll also find this agent in the ADK-TS Samples Repository, which may include newer versions as the framework evolves.
For more templates, check out the ADK-TS x402 agent template for agents with crypto payments. Contributions to either repo are welcome. And if you’re new to open source, this guide to getting started can help you make your first contribution.
Useful Resources
- ADK-TS Documentation: Official framework docs covering agents, state, callbacks, and memory
- ADK-TS GitHub Repository: Source code, issues, and discussions
- ADK-TS Samples Repository: More example projects
- Introducing the Agent Development Kit (ADK) for TypeScript: Overview of ADK-TS and its design goals
- How to Add Persistence and Long-Term Memory to AI Agents: Deep dive into memory patterns across frameworks
Frequently Asked Questions
What are callbacks in AI agent frameworks?
Callbacks are lifecycle hooks that let you run custom code before and after key events in an agent pipeline, like an agent starting its turn or a tool being called. They’re useful for adding logging, validation, rate limiting, or conditional logic without modifying the agent’s core behavior.
In ADK-TS, these are beforeAgentCallback, afterAgentCallback, beforeToolCallback, and afterToolCallback, each receiving context about the current agent, session state, and invocation.
How do you monitor and log AI agent execution?
Most agent frameworks support lifecycle hooks that fire when agents start and finish. You can use these to log progress, record timestamps, and calculate how long each step takes. For example, beforeAgentCallback and afterAgentCallback cover agent-level monitoring, while afterToolCallback lets you log individual tool calls and their results.
For production, you’d send these metrics to an observability platform instead of logging to the console.
How do you rate-limit AI agent tool calls?
The most reliable approach is intercepting tool calls at the framework level rather than relying on prompt instructions. Use a before-tool hook with a counter or “in progress” flag in a temporary state.
When a tool call comes in, check the counter. If it exceeds the limit, return an override response instead of executing the tool. With beforeToolCallback, for instance, you return a dictionary that the LLM sees as the tool’s response, effectively blocking the real call.
What is session state in AI agents, and how does it work?
Session state is a shared key-value store that agents read from and write to during a pipeline run. It’s how agents pass data to each other without being directly coupled. Most frameworks also support scoping state to different levels.
A common pattern is using key prefixes to separate app-wide config (app:), per-user preferences (user:), ephemeral data (temp:), and session-scoped pipeline outputs (unprefixed). This way, each scope has clear boundaries and cleanup rules.
What is the difference between short-term and long-term AI agent memory?
Short-term memory is the working data agents use during a single conversation or pipeline run, typically stored in session state. It gets cleared when the session ends.
Long-term memory persists across sessions, storing past conversations in a searchable format so agents can recall previous work, avoid repeating tasks, or build on earlier findings. Typically, session state handles the short-term side, while a dedicated memory service, such as MemoryService, provides long-term storage and search.
How do you make AI agents remember past conversations?
You need a memory layer that stores completed sessions and makes them searchable in future runs. After a pipeline finishes, save the session (including all accumulated state) to a storage backend. In later sessions, search that storage by topic or keyword to retrieve relevant past work.
Most frameworks expose something like addSessionToMemory() to save and search() to query. Use an in-memory provider for development and a persistent backend like PostgreSQL or a vector database for production.
How do you configure AI agent behavior at runtime without changing code?
Store configuration values in session state and reference them in agent instructions using template syntax. When the agent runs, the template gets replaced with the actual value from state. This lets you change behavior per user, per request, or per environment without touching agent code.
For example, you could set app:report_length to "brief" in state, and an instruction containing {app:report_length} resolves to brief at runtime.
How do you conditionally skip steps in a multi-agent AI pipeline?
Use a before-agent hook to check whether the agent’s work has already been done, such as by looking for existing output in state. If the output exists, return it directly from the hook instead of letting the agent run. The pipeline continues to the next step as if the skipped agent had completed normally.
With beforeAgentCallback, for instance, returning a Content object skips the agent entirely. If the agent has an outputKey, the returned content is automatically saved to state, so downstream agents still see the expected data.
How do you debug a multi-agent AI system?
Start by logging the full session state after each agent completes. This shows you exactly what data each agent produced and whether downstream agents are getting the inputs they expect. Look for missing keys, unexpected values, or ordering issues.
A diagnostic afterAgentCallback that dumps state after each step makes this easy to set up. Some frameworks also offer visual interfaces (such as the ADK-TS web interface) that let you inspect each agent’s input and output in real time.
What is the best way to store AI agent memory in production?
In-memory storage works for development but resets when your app restarts. For production, use a persistent backend. Popular choices include PostgreSQL for structured storage, Redis for fast access, or vector databases like Pinecone or Weaviate for semantic search over past conversations.
The right choice depends on whether you need exact keyword retrieval or similarity-based search. Most frameworks let you swap the storage provider by implementing a standard interface, so you can start with the simplest solution and upgrade later without changing your agent code.


